A small entry can look messy fast, and it’s usually not because you own too many shoes. It’s because the space has no clear limit, no clear wet first spot, and no place for the extra things that arrive with you: keys, mail, dog leash, kids gear.
The fixes follow a simple idea: treat shoe storage like part of the wall plan, then let the storage itself guide behavior. The sections below break down the repeat moves that keep tight entries looking clean without daily arguing with the space.
What does repeat is the logic. The good setups behave like a small system, not a random rack near the door:
- Shoe storage gets treated like part of the wall (or a built-in composition), not an afterthought.
- Capacity is visible, so the space self-corrects before shoes spill out.
- The messy arrival stuff, wet soles, grit, kids pairs, sports shoes, mail, leashes, gets its own landing spots, so shoes don’t turn into the default dumping shelf.
- Rhythm (slats, grids, lanes, repeated spacing) makes mixed footwear look tidy even when it’s not color-coordinated.
- There’s a dirt gradient: nearest the door is rough-use; farther in is cleaner; shoes move upward only after they’re ready.
That’s the quiet reason the entries look finished even when they’re doing real daily work.

Make the storage do the counting
The fastest way to stop shoe creep is to let the furniture set the limit. There are two main formats for that.

1) Grids and cubbies
A grid turns every slot into a decision. One slot equals one pair.
When it’s full, you see it instantly.

A setup that keeps the grid useful (and not maxed-out-looking all the time):
- Give each person a column or a row.
- Keep 2–3 empty slots for guests or the random pair you didn’t plan for.
- Reserve one slot for utility shoes (trash, quick errands, dog walk).
2) Long lanes
A lane shelf does the same job, but with length instead of boxes. The full line is obvious because the row ends.

A simple way to divide lanes so they stay readable:
- Each person gets a stretch of lane.
- One end becomes the wet lane. Damp pairs go there first, then migrate to the normal zone after drying.
- Keep open shelves for today/this week; push overflow to baskets, drawers, upper cabinets, or behind panels.
A lot of designs use a two-level logic without making a big deal of it: open shelves for daily rotation, hidden storage for seasonal overflow. That split is why the visible area stays calm.

The dirt gradient is doing more work than any tray system
A simple hygiene map, even when no one labels it.

There’s usually a landing surface by the door: a mat or runner. It’s not decoration; it’s the pause point where grit gets contained before shoes go into storage.

Then the storage reinforces the routine: the lowest shelf / lowest lane becomes the working zone. Wet or dirty shoes live low first.
Cleaner pairs rise higher.

A routine pulled straight from the repeated pattern:
Step in → shoes pause on the runner → damp pairs go to the bottom lane → after drying, they move to their normal slot → the cleanest pairs stay mid-to-upper, so the top of the wall stays visually light. This is why entries can look tidy without relying on gadgets everywhere.
Placement does the policing.

Boots: a different category, because they are
Boots are the item that breaks shelf rhythm. One tall pair forces everything else to shuffle, and suddenly the wall looks messy.

The shoe storage design can avoid fighting this. It can give boots a dedicated home:
- A boot bay built into the bench base.
- A one-side / one-end boot zone.
- Taller compartments mixed into the grid.
- Under-stair end pockets where height naturally increases.
The rule is blunt but practical: don’t force boots into the same spacing rhythm as sneakers. Give them one vertical bay, one end zone, or one tall basket.
That single move prevents the classic boots on the floor in random spots look.

Shoes stay under control when other stuff gets a real address
A lot of entry chaos isn’t shoes. It’s the small objects that arrive with you.
It can be solved by giving non-shoe items their own lane, so shoe shelves don’t get hijacked. The tools are:
- Baskets as visual erasers. They hide irregular shapes and mismatched colors, and they enforce categories without labels.
- Drawers for the tiny chaotic pieces.
- Side pockets or vertical niches that catch mail, leashes, and quick-drop items.
- A top shelf line for overflow you need near the door but don’t want in your face.
The simple solution is to add a non-shoe lane. Even a narrow pocket changes the whole behavior of the wall.

The bench wall that doesn’t turn into a mess magnet
Bench-based setups can be built like a small composition:
- The bench gives the practical reason to stop at the entry and sit.
- Under the bench, shoe lanes stay open and easy to use, so shoes don’t pile in front of the bench.
- Above the bench, hooks exist—but they’re limited on purpose. Too many hooks becomes a coat explosion.
- One drawer or a lidded basket catches keys, wipes, laces, and the random items that otherwise land on the bench.
- A runner marks the landing zone so the entry has a clear first step area.
Why it matters: the bench becomes a useful stop, not a flat platform for mail. The rest of the system supports that behavior.

The visual tricks that make storage look intentional
It doesn’t need expensive materials to get the planned effect.
Rhythm is the big one.
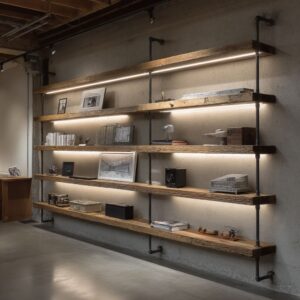
Vertical slats, strict grids, and runway shelves all do the same thing: they keep the framework consistent so shoe variety doesn’t look chaotic.

Backings act like a filter.
Woven/cane-like backing, patterned cubby backing, fluted texture around an alcove, paneling behind hooks and shelves. These reduce the visual harshness of silhouettes and scuffs.
Heavy low, light high.
Bulky/darker shoes sit low; lighter, cleaner pairs rise. It keeps a narrow wall from feeling top-heavy.
Give the wall a second job.
A sconce + hooks, art above a console, shelf + decor, or a mirror that doubles as an outfit-check zone. You notice finished wall first, shoes second.

Pick the layout type first, then choose the storage format
This is where most designs win or fail. The door swing and walkway decide what works.
- Narrow corridor / door swing constraints: terminal wall storage, thin ledges + mirror, flush panel wall with a niche + mirror. This is why small hallway shoe storage ideas work best when they stay shallow.
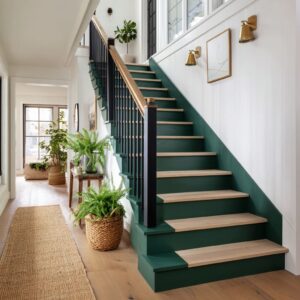
- Stair-adjacent entries: long under-stair lanes, mixed cubby geometry with a lighting line, bench stage + tall shoe library. The storage looks planned when it follows the stair slope instead of fighting it.
- Recessed niche or wall thickness available: tall grid niche with lighting, recessed grid + bench lounge, mudroom niche with upper cabinets, framed niche with three vertical columns. This keeps walking width intact.
- Corners that can become a destination: wrap-around bench/hook/tall cabinet unit, corner banquette with boot bay, curved corner cabinets. Corners stop being dead zones when the storage has a clear purpose.
This is the moment where small entryway shoe storage ideas for entryway becomes a plan: match the storage depth to the circulation first.

Materials and lighting: the repeat choices are not random
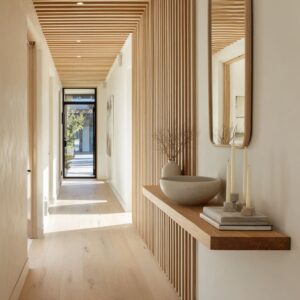
Warm wood and slats show up a lot in modern interiors because they hide minor scuffs better than glossy white and they bring warmth into a tight zone. Pairing warm wood with light walls keeps the wall from feeling heavy.

A dark paneled wall is also a smart move in a shoe-heavy entry: dark background + woven baskets makes visual clutter less loud, while textures still feel rich.

Slatted bench tops and shelf surfaces help in two ways: the surface doesn’t show every small mess, and the texture discourages random piles because it doesn’t feel like a perfect flat staging area.

Metal accents show up as thin lines: rails, hooks, one underline detail. It’s not a shiny theme.
It’s a small finish note that doesn’t add more stuff.

Lighting is where storage starts feeling like part of the interior:
- Downlights washing the top row
- A diagonal ribbon under stairs to unify compartments
- A single sconce to claim the entry wall
- Cabinet shelf lighting to avoid dark pockets

A practical combo
If the entry is extremely tight: thin ledges + mirror, one floor-level boot spot at the end, one small basket above for gloves/leashes.

If it needs a sitting routine: bench + open lanes, limited hooks, one drawer or basket for small items.
If it needs capacity without visual mess: tall grid or columns plus a softened backing, bottom row reserved for outdoor/wet pairs, and 2–3 empty slots so it never feels maxed out.
If the layout has stairs right there: long lanes plus a side boot zone, or the mixed-geometry cubbies + diagonal light line, with one drawer for laces and wipes.
To archive an architectural look: flush panels + lit niche or a slat-front volume with open base shelves and a side pocket, then add a mirror panel.

This is the same logic that can be seen in small mudroom shoe storage ideas, just scaled down to fit a normal entry.

The little habits that keep the wall looking good
- Toe-forward alignment isn’t a rule; it’s a silhouette trick. It makes the line of shoes read as one shape instead of scattered angles.
- Leave breathing gaps. When every shelf edge-to-edge is filled, the wall looks stressed.
- Give the top of the wall one cap item (basket or planter) so the composition ends on purpose.
- Keep decor off shoe shelves by giving keys and mail a separate pocket.
- Put boots at one side like a small floor cluster instead of mixing them into the main shelf rhythm.
- Upper cabinets hide the messy truth: off-season and extras live up there so the visible area stays controlled.
- A textured rug quietly tells people where the landing zone is. That cue keeps the floor area in front of the storage from becoming the pile zone.

Where entries usually go wrong
One storage type for everything is the classic mistake. Only racks, only cubbies, only cabinets rarely match real footwear.
It can be fixed by mixing formats so boots, kids shoes, and everyday pairs each have a sensible spot.

No plan for non-shoe items turns shoe shelves into the junk shelf. it can be solved with pockets, niches, and drawers.
No wet lane means damp shoes migrate everywhere. The fix is simple: bottom row or bottom lane is the first stop.
Storage placed in the door swing zone stops getting used. Terminal wall approach avoids collisions, so the system stays practical.
That’s why shoe storage ideas for small hallway often fail: the furniture is fine, but the circulation and zoning weren’t decided first.