Decorating your front door for Halloween doesn’t have to be complicated. Whether you’re looking for a last-minute spooky display or a playful touch for trick-or-treaters, transforming your entryway into a fun Halloween scene is easy with DIY projects.
In this guide, we’ll show you how to create two festive door decorations—a colorful Monster and a creepy, yet playful, Mummy. Using simple materials like streamers and construction paper, these budget-friendly ideas will bring your front door to life while adding a festive vibe to your home.
Perfect for anyone looking to create a memorable Halloween scene without a lot of effort or expense, these decorations are sure to impress!
Halloween Monster Door Decorations
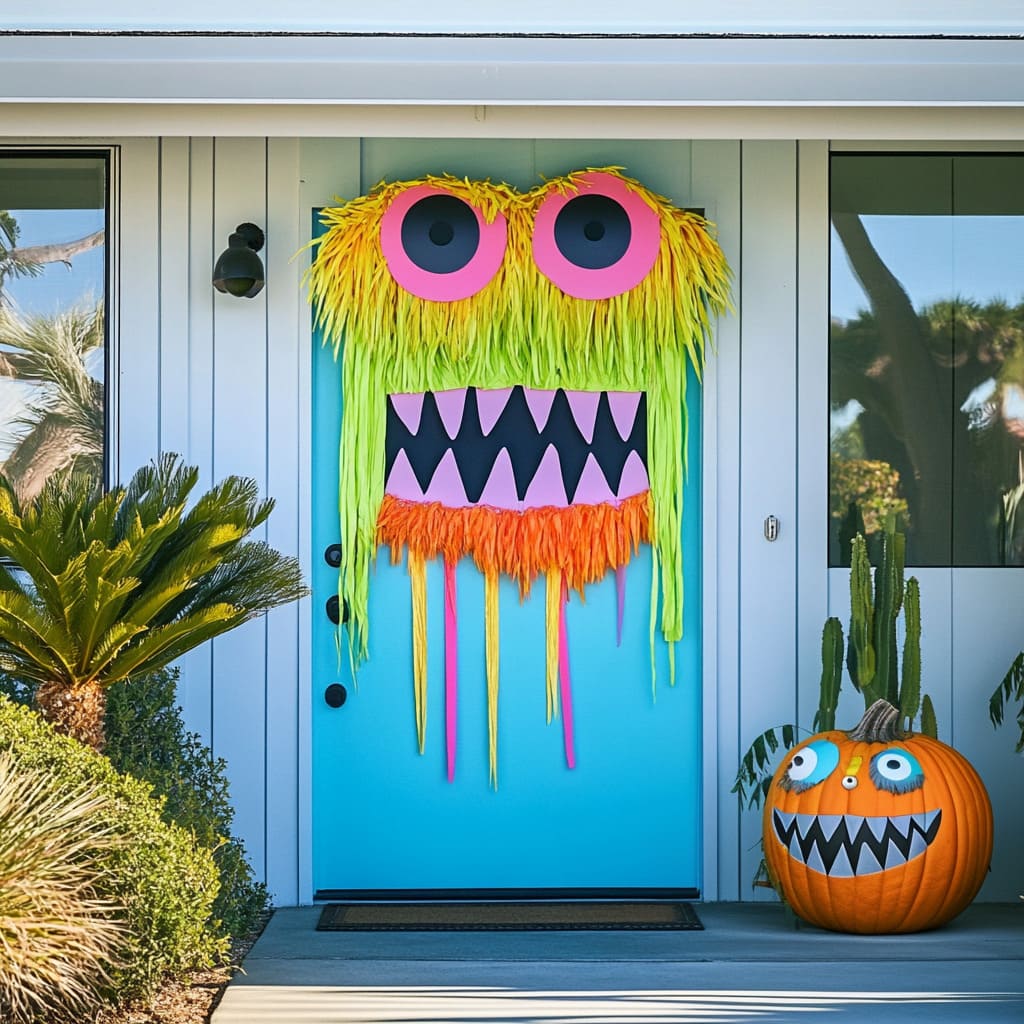
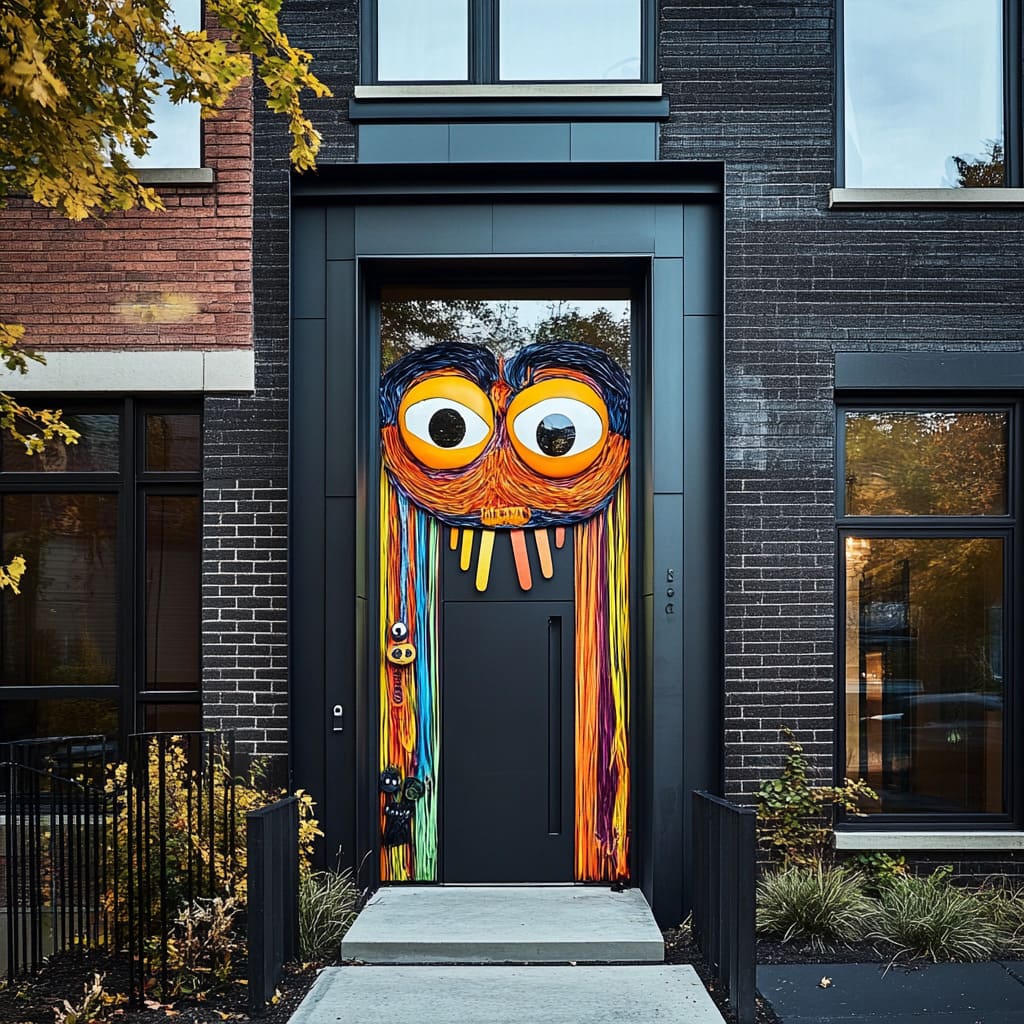
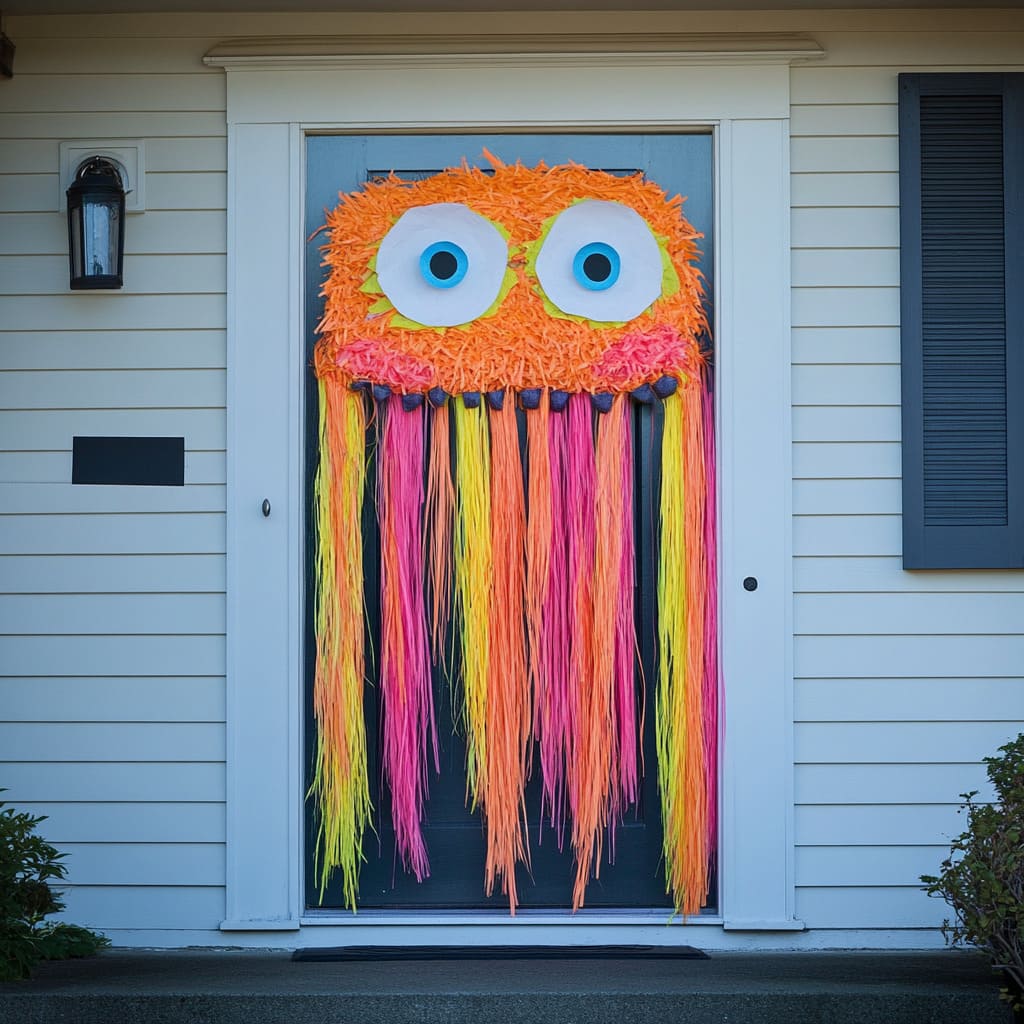
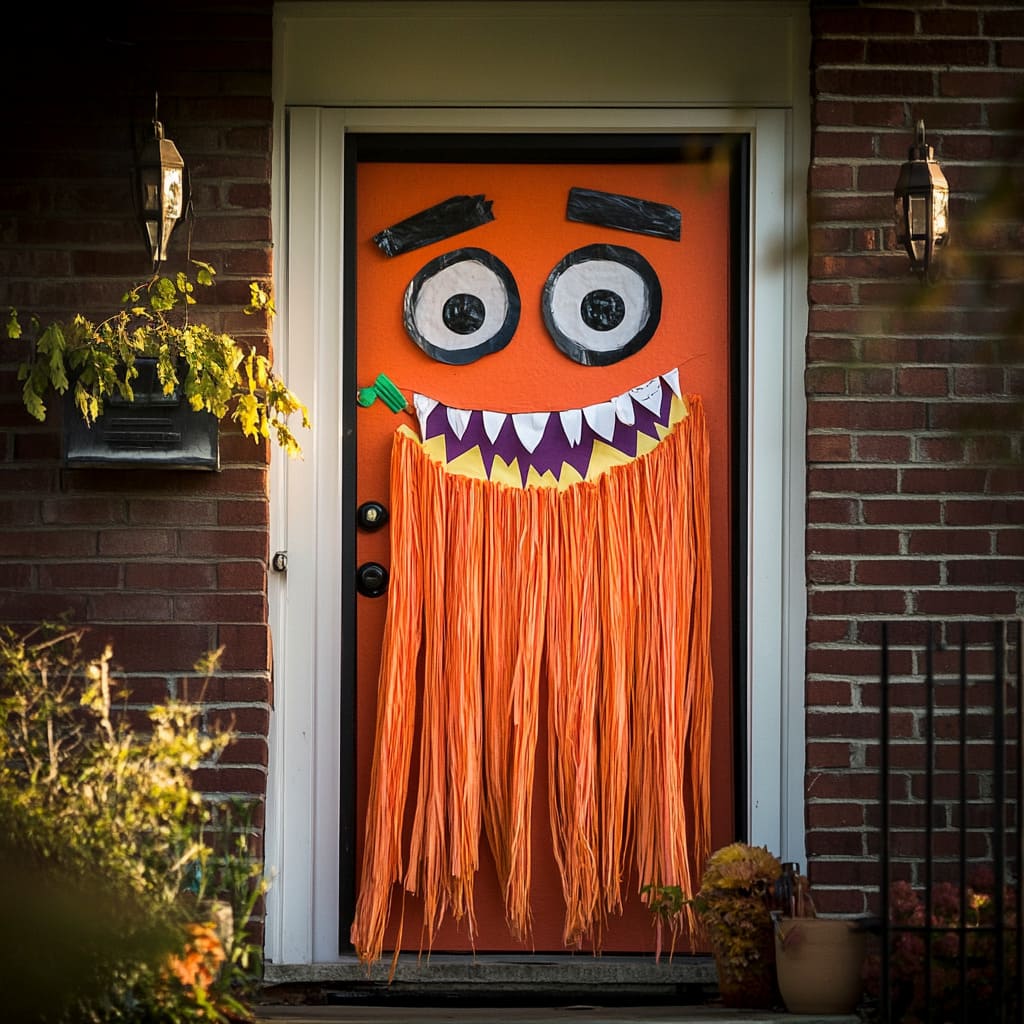
This vibrant and playful DIY Halloween outdoor decoration transforms a front door into a lively, colorful monster using streamers and construction paper. Perfect for those looking for a last-minute but impactful Halloween design, this decoration combines simplicity and creativity.
The result is a fun, eye-catching display that’s sure to delight trick-or-treaters, guests, and passersby alike. Here’s a detailed breakdown of how to create this exciting door monster with easily accessible materials.
Materials and Preparation:
For this DIY monster door, you’ll need the following materials:
- Vibrant-colored streamers (in shades of orange, yellow, pink, red, or your choice of bright colors)
- Large sheets of construction paper (white, black, and blue)
- Scissors
- Double-sided tape or adhesive strips (for securing the streamers and paper elements to the door)
- Optional: A glue gun for more secure attachments
Streamers in bold colors give the monster its wild and unruly ‘hair,’ while construction paper is used to create oversized eyes and sharp, dramatic teeth. This combination of lightweight materials makes the decoration easy to assemble and hang, while also being simple to remove after Halloween.
Creating the Monster’s Hair with Streamers:
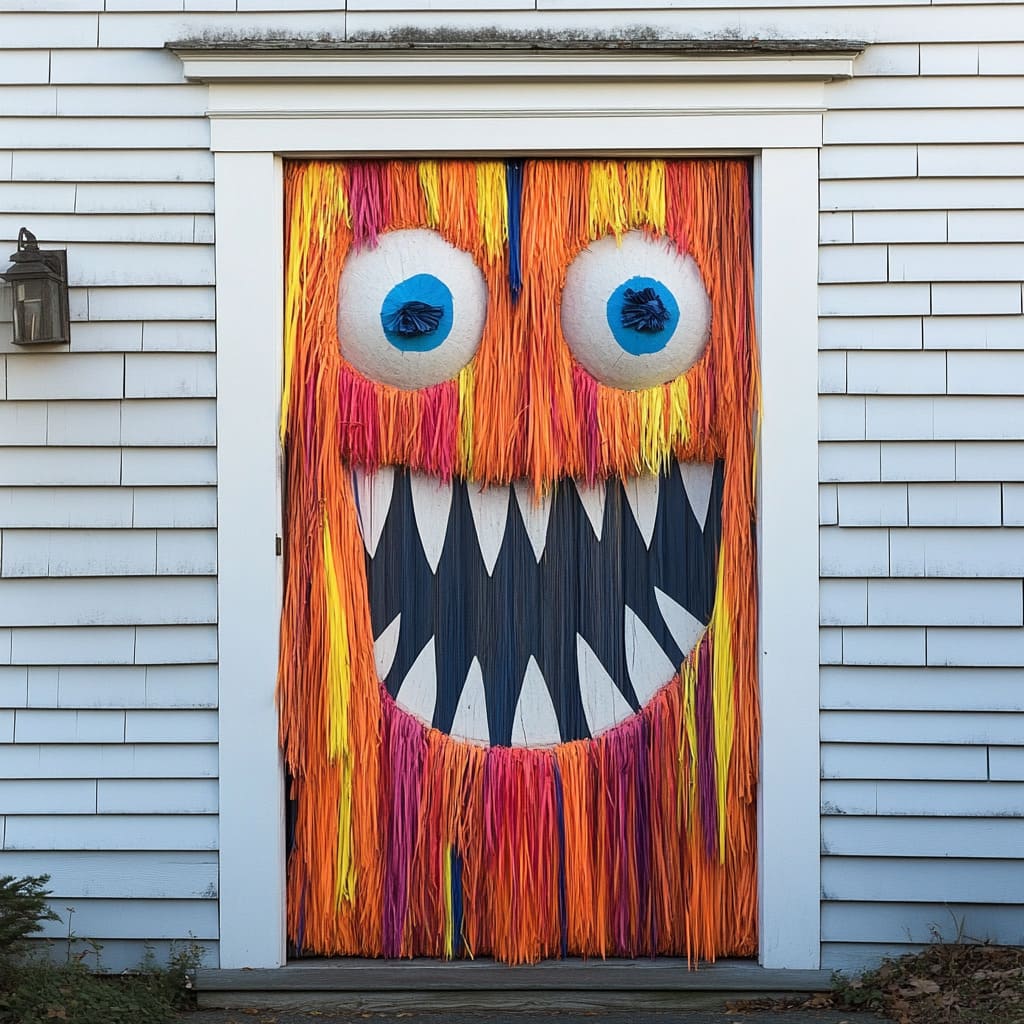
The first step is to create the monster’s hair, which covers most of the door. Choose a selection of brightly colored streamers, preferably in shades that pop against the background of your door.
For example, in the image, we see shades of orange, pink, red, and yellow, but you can experiment with any colors that suit your theme. Start by cutting long strands of streamers, approximately the height of your door, plus a few extra inches for some added texture and flow.
You want the hair to appear wild and unkempt, so varying the lengths slightly adds to the character. Attach the top of each streamer strip to the top of the door using double-sided tape or adhesive strips.
Layer the streamers densely enough that they cover the door but leave room for the eyes and mouth to be clearly visible. You can also crisscross the streamers or bunch some areas for added texture and volume.
Allow some of the streamers to drape naturally or curl them for a more chaotic look, mimicking the monster’s wild, unruly hair. This creates a dynamic and whimsical effect as the streamers move slightly with the breeze.
Designing the Monster’s Eyes:
The oversized eyes are one of the most striking features of the door monster, giving it a playful and larger-than-life appearance. Using large sheets of white construction paper, cut out two big circles to form the base of the eyes.
Make sure they are proportionate to the size of your door—big enough to grab attention but not so large that they overwhelm the other design elements. For the pupils, cut two smaller circles from black construction paper and glue or tape them in the center of the white circles.
If you want to add a more cartoonish look, you can cut even smaller circles from blue paper and place them under the black pupils, giving the eyes a more lively, animated feel, as shown in the image. Alternatively, you can play with different expressions by positioning the pupils in various directions, making the monster look curious, silly, or even surprised.
Once the eyes are assembled, attach them to the upper portion of the door, over the streamers, using double-sided tape. Make sure the eyes are evenly spaced and securely fastened.
The larger size and vibrant colors make them the focal point of the decoration, immediately drawing attention.
Creating the Monster’s Mouth and Fangs:
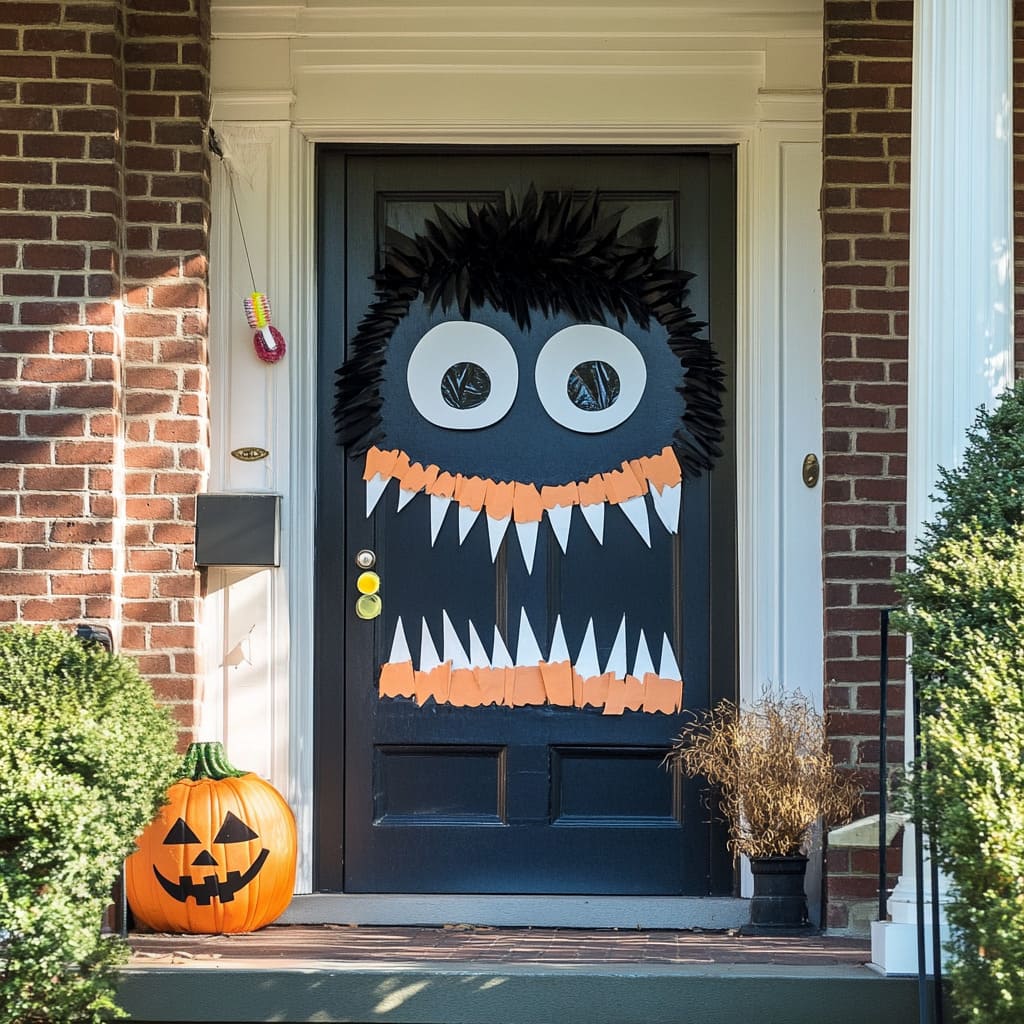
The next step is crafting the monster’s wide, toothy grin. Begin by cutting a large, semi-circular shape from black construction paper, which will serve as the open mouth.
The black contrasts sharply against the vibrant streamers and light background of the door, giving the appearance of a dark, gaping maw. Next, cut out long, triangular teeth from white construction paper to form the monster’s sharp fangs.
These triangles should vary slightly in size for a more organic, cartoonish look, giving the monster a playful rather than frightening appearance. Glue or tape the teeth along the edge of the black mouthpiece, alternating their lengths to add interest.
You can create as many teeth as you want, spacing them close together for a fuller grin or further apart for a more menacing look. Once the mouth and teeth are assembled, secure the piece toward the lower center of the door, directly beneath the eyes.
Position the mouth so that it lines up with the flow of the streamers, creating the illusion that the hair is cascading around the face. The large, exaggerated teeth give the monster a quirky and friendly personality, making it more fun than fearsome.
Securing the Design to the Door:
After assembling the monster’s facial features, it’s time to ensure everything is securely attached. Use strong adhesive strips or a glue gun (if necessary) to reinforce the streamers, eyes, and mouth.
This is especially important if your door is exposed to outdoor elements like wind or rain. Make sure the streamers are tightly attached at the top, but loose enough at the bottom to allow for some movement, which adds life and personality to the monster’s appearance.
If your door will be frequently opened and closed, be sure to avoid placing the decorations too close to the edges where they might get caught. The center of the door should remain clear of any obstructive materials, ensuring it can function as intended without damaging the design.
Personalizing and Adding Extra Features:
One of the best aspects of this DIY project is the flexibility it offers for personalization. You can modify the expression of the monster by changing the shape of the eyes, adding eyebrows for a more dramatic look, or adjusting the number of teeth for a scarier or friendlier grin.
You can even add additional features like a tongue (using red paper) or cheeky accessories, like a party hat or bowtie, to give your monster more personality. You can also enhance the visual impact of the monster by adding more elements to the surrounding area.
Consider placing faux cobwebs, spiders, or bats around the frame of the door to complete the Halloween theme. You could also hang small lights or glow sticks around the door to illuminate the monster at night, making it visible even in the dark.
A small doormat with a funny or spooky Halloween message could complement the design and add another layer of charm to your porch.
The Final Look:
Once all the elements are securely in place, step back and admire your colorful, playful monster door. The vibrant streamers, oversized eyes, and sharp teeth create a bold and fun Halloween display that is sure to capture attention.
The bright colors stand out against the neutral tones of most house exteriors, making the monster an immediate focal point. The cascading streamers move gently in the breeze, giving the illusion that the monster’s hair is wild and alive, while the exaggerated facial features add a cartoonish, whimsical feel.
This decoration strikes the perfect balance between spooky and playful, making it ideal for homes that want to embrace the Halloween spirit without going too scary. It’s an especially fun option for families with young children, as the design is more humorous than frightening.
This DIY monster door is a creative, easy-to-execute, and highly customizable Halloween decoration that makes a big impact with minimal effort. The use of brightly colored streamers for the hair, along with oversized construction paper eyes and fangs, turns a standard front door into a fun, friendly Halloween creature.
Whether you’re decorating for trick-or-treaters, a party, or just to surprise your neighbors, this monster is sure to bring smiles and excitement to everyone who sees it.
Halloween Mummy Door Decorations
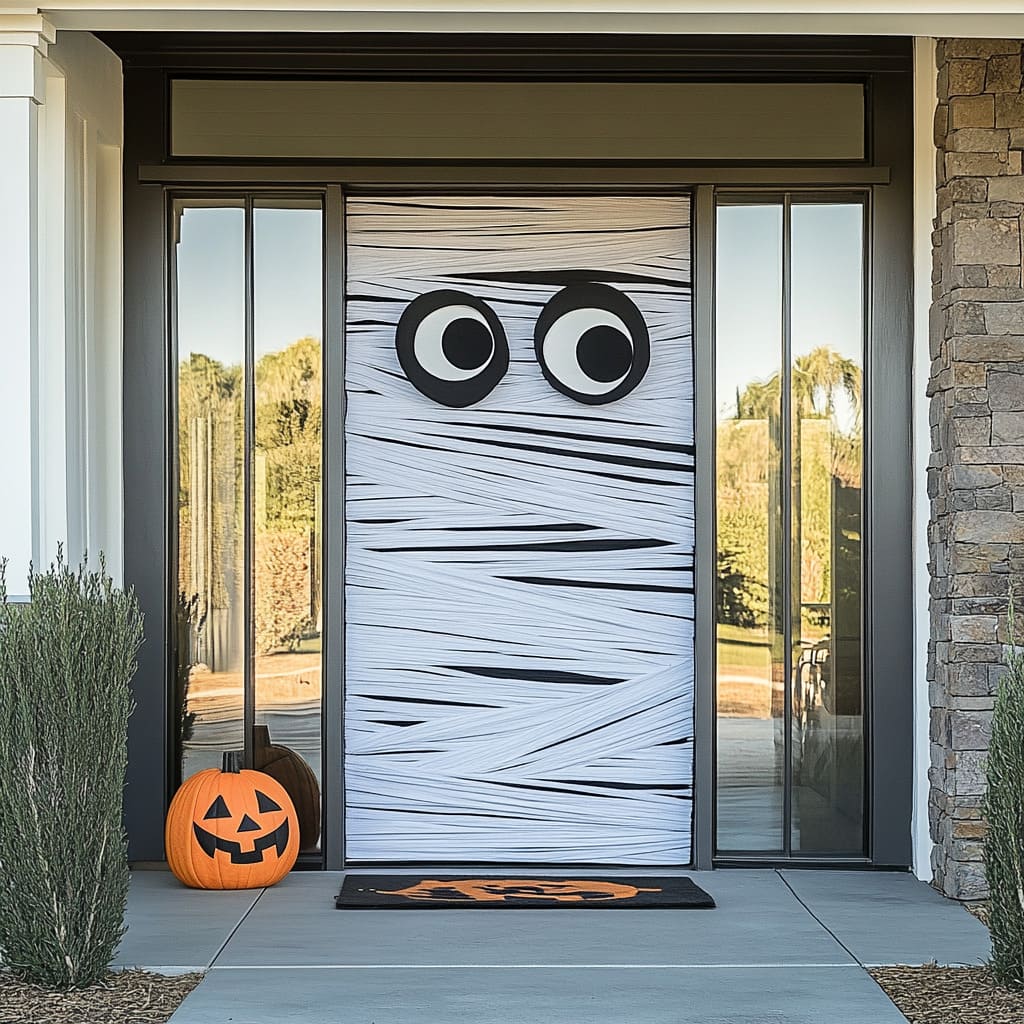
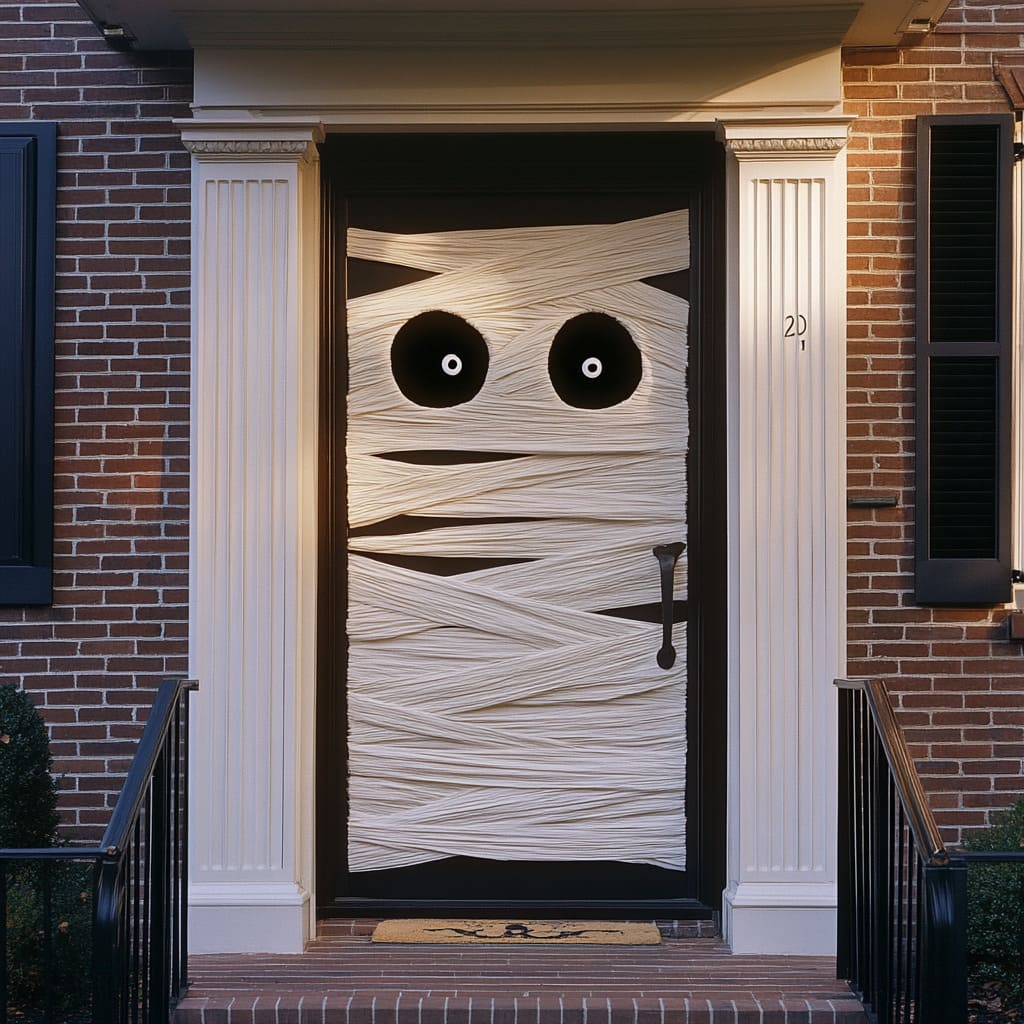
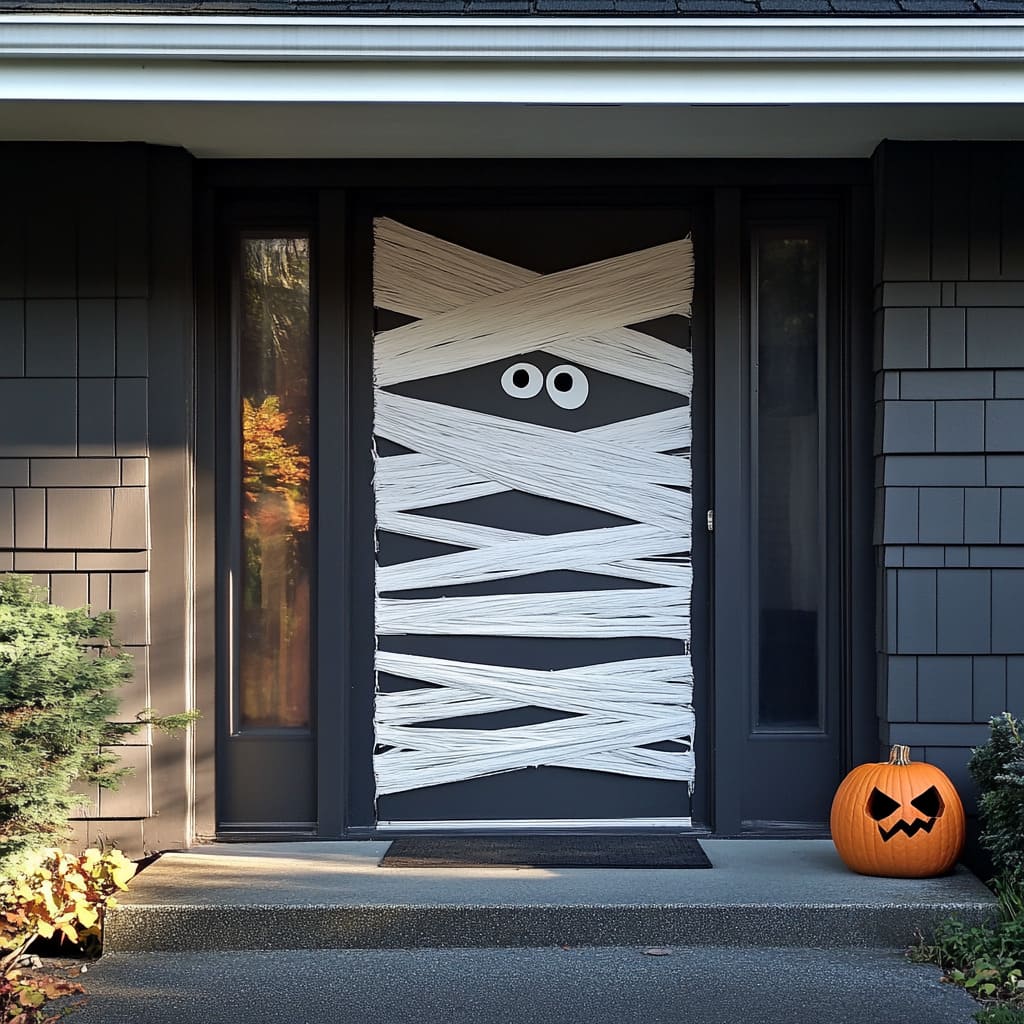
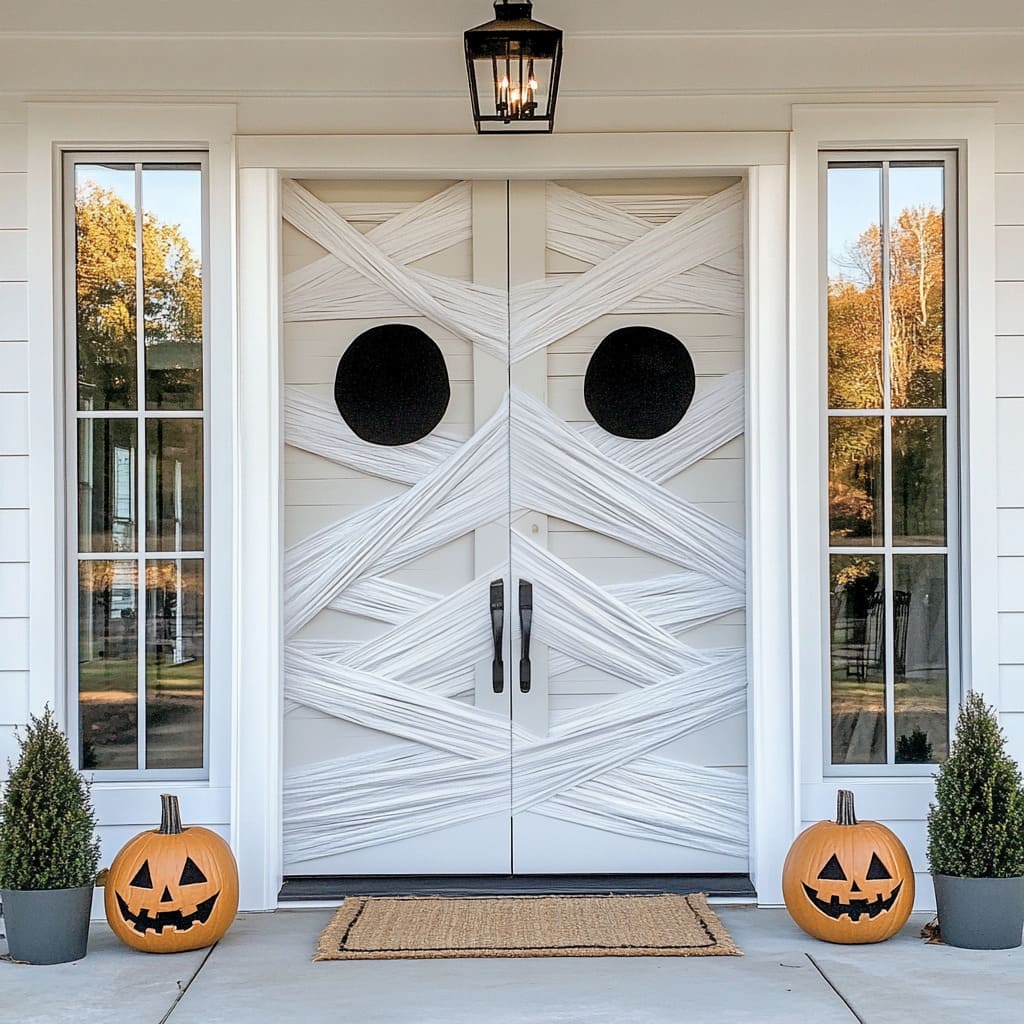
This fun and easy DIY Halloween decoration transforms a simple front door into a spooky yet playful mummy using white streamers and black cut-out eyes. With minimal effort and supplies, this project is perfect for those looking for a last-minute Halloween setup that still delivers a bold impact.
The crisscrossed streamers mimic the wrapped bandages of a mummy, while large, comical eyes peeking through the gaps give the decoration a personality that’s both eerie and inviting.
Materials and Preparation:
To create this mummy door, you will need the following supplies:.
- White streamers (or toilet paper or crepe paper)
- Black construction paper or cardstock
- White construction paper or cardstock (for the eyes)
- Scissors
- Double-sided tape or adhesive strips (for securing the streamers and paper elements)
- Optional: A glue gun for more secure attachments if the weather is windy
Streamers or crepe paper work best for this design because they’re lightweight and easy to manipulate, giving the door a wrapped, bandaged appearance. If you’re in a pinch, toilet paper can be used as a backup option, though streamers are sturdier and more resistant to the elements.
The oversized eyes, made from black and white construction paper, are crucial to the overall effect, giving the mummy a fun, watchful expression as it “greets” trick-or-treaters and guests.
Covering the Door with Streamers:
Begin by cutting long strips of white streamers (or crepe paper), long enough to stretch horizontally across the width of the door. You’ll want to crisscross the streamers over one another to create a random, layered effect that resembles a mummy’s bandages.
Start at the top of the door and work your way down, attaching the ends of each streamer to the sides of the door using double-sided tape or adhesive strips. The goal is to make it look like the door has been wrapped up in haphazard, overlapping strips of cloth, so don’t worry about neatness—imperfections add to the charm.
Leave some gaps between the streamers, especially in the middle section of the door, where the eyes will eventually go. These openings will make it appear as if the mummy’s “face” is peeking through its bandages.
You can angle the streamers in various directions, such as diagonally or even slightly twisted, to make the door look more dynamic and realistic. Be sure to cover the door handle as well, integrating it into the design to maintain the illusion.
Creating the Mummy’s Eyes:
The oversized eyes are the key feature of this mummy decoration, giving it character and an inviting expression. To make the eyes, cut two large circles from black construction paper, making sure they’re proportionate to the door—big enough to be seen from a distance, but not so large that they dominate the entire design.
These black circles will form the background of the eyes. Next, cut two smaller circles from white construction paper to create the pupils, and place them in the center of the black circles.
You can position the white pupils slightly off-center to give the mummy a playful, curious expression, or place them straight in the middle for a more focused, alert look. Alternatively, if you want the mummy to appear a little sillier, you can make one pupil larger than the other or position them in different directions.
Attach the eyes to the door using double-sided tape or adhesive strips, making sure they are securely placed in the gap between the streamers. The effect should make it appear as if the eyes are peering out from behind the bandages, adding an element of surprise and personality.
Adding Finishing Touches:
Once the streamers are in place and the eyes are attached, take a step back and assess the overall look of the door. If any areas seem too sparse or need more “bandaging,” add additional layers of streamers over the door.
You can also tuck some of the streamer ends under others to make the wrapping look more natural. For added effect, consider adding a few strategic tears or holes in the streamers to give the appearance of an ancient, tattered mummy.
Small rips in the paper will add texture and make the mummy look more worn and realistic. If your door has a door handle or knocker, try to wrap streamers around these elements so that they blend into the overall design.
However, leave the handle accessible enough that it can still function if necessary.
- Optional: Adding a Glow Effect: For an extra spooky effect at night, consider adding some low-light LED string lights behind the streamers. The soft glow coming from behind the mummy’s bandages will create an eerie backlighting effect that enhances the overall mood of your Halloween display. You could also place small battery-operated LED lights behind the eyes, making them glow in the dark and giving the mummy an even more haunting stare.
- Securing the Design: Make sure everything is well-secured, especially if your area tends to experience windy weather. Use a glue gun or stronger adhesive strips to reinforce the streamer edges and eye cutouts. You may also want to use additional tape to keep any loose streamer ends from blowing in the wind or coming undone. For door handles, ensure the decorations won’t interfere with opening and closing the door.
- Enhancing the Surrounding Area: While the mummy door is a striking centerpiece, you can enhance the overall scene by adding complementary Halloween decorations around the porch or entryway. Consider placing faux cobwebs in the corners of the door frame or adding some spooky accessories, like plastic spiders or bats. You can also place carved pumpkins or lanterns on the steps or around the doorway to complete the Halloween atmosphere. A doormat with a funny or spooky message would add to the charm and help tie the whole look together.
The Final Look:
When complete, this mummy door creates an eye-catching, playful display that is both festive and spooky. The crisscrossed white streamers give the door a convincing wrapped look, while the large black eyes add a sense of personality and humor to the decoration.
The mummy seems to be peering out from behind its bandages, giving the impression that it’s watching over your porch and waiting to greet visitors. The simple design, combined with the oversized, expressive eyes, creates a memorable and engaging decoration that’s sure to delight both children and adults.
The bright white streamers stand out against the dark backdrop of the door, making the mummy visible even from the street. At night, if you’ve added the glow effect or lights, the door takes on an even spookier appearance, with the mummy’s eyes glowing eerily in the darkness.
The mummy’s fun and approachable design makes it a great option for homes that want to participate in Halloween festivities without leaning too heavily into gory or frightening themes, making it perfect for families and neighborhoods with young children.
Customization Options:
This DIY mummy door is highly customizable. You can change the expression of the mummy by altering the size or positioning of the eyes, making it look sleepy, goofy, or menacing.
You can also vary the materials used, substituting white gauze, strips of fabric, or even an old sheet for the streamers to give the mummy a more textured, realistic look. If you prefer a more minimalist design, you can use fewer streamers and a smaller set of eyes, giving the mummy a subtler, more mysterious vibe.
If you’re feeling creative, you could add more details to the mummy, such as a cut-out mouth, fangs, or even some decorative accessories like a Halloween bowtie or hat. You can also create a family of mummies by adding additional decorations to nearby windows or doors.
One of the best aspects of this DIY project is how quick and inexpensive it is to create. White streamers, construction paper, and tape are all budget-friendly materials that are widely available, and the entire project can be assembled in under an hour.
The low cost and ease of assembly make it an ideal last-minute Halloween decoration, especially for those who want to participate in the festivities without spending a lot of time or money. This DIY mummy door is a simple yet striking Halloween decoration that adds a fun and spooky touch to any home.
With its crisscrossed streamers, peering eyes, and playful design, this mummy greets guests with a whimsical Halloween spirit. Whether you’re looking for a last-minute project or something easy and affordable, this mummy door offers a creative way to make your home stand out during the Halloween season.
It’s perfect for families and neighborhoods and can be customized to suit your style and preferences.
Conclusion
Creating DIY Halloween decorations for your front door can be a fun and rewarding project that’s perfect for families or anyone wanting to celebrate the season in style. From the playful Monster with its wild streamers and colorful face to the spooky yet approachable Mummy, these easy-to-make designs bring a festive spirit to your home’s exterior.
Whether you’re welcoming trick-or-treaters or decorating for a neighborhood event, these budget-friendly and customizable decorations will help set the perfect Halloween mood. So grab your supplies and start transforming your front door into a fun Halloween display today!

